Saturday, May 24, 2014

One year utility breakdown

It's been about a year and some change since I've moved in. So far, it's been great. The memories of all the stress and turmoil are fading away. My mortgage isn't, but at least the stream of expenses is predictable and manageable.

One thing I've been curious about is how much utilities will cost for the house. With 12 months of data and 3 people in the house, the average cost of utilities breaks down to this:

  • Gas (heating, hot water, and stove) - $78/month
  • Electricity (lights, computers, servers, etc) - $58/month
  • Water, Sewer, and Trash (Seattle public utilities clumps these together) - $95/month
I was expecting worse, so I'm okay with the cost. I think that with a solar system upgrade, I can knock down the cost of electricity. I'm also considering adding some sort of rain catchment for watering plants outside to keep the water bill lower. 

Wednesday, March 27, 2013

Siding Part 3 - Corten Steel

House update: As of March 4th, I have my certificate of occupancy! I'm mostly moved in, but the blog is still not caught up. Not surprisingly, it's been a bit busy as of late... 

The second material to be installed on the exterior of the house was 14-gauge hardened weathering steel (or Corten). This is a type of steel that is designed to rust. With this particular steel alloy, the layer of corrosion on the surface protects the metal underneath, so the steel won't rust all the way through. As with the cedar siding, the intent is for this siding to be zero-maintenance. I should never need to do any painting other than the occasional rinse to keep it looking good.

Corten steel siding starting to rust on the house
The application of this siding was relatively simple, but the subcontrator had a very difficult time installing it. Each sheet of steel was very heavy and they broke many saw blades cutting it all to shape. The sheets are screwed into the wall with stainless steel screws and a generous application of caulking. The seams between the sheets are protected with a wide piece of weather stripping and caulking. We had some pretty heavy rains over the last couple months and there hasn't even been a hint of water infiltration, so I feel pretty good about this application.

Raw corten steel sheets

corten steel siding against charred cedar


soffit above the master bedroom sliders

steel siding on the deck

steel siding on the deck
I'm really happy with how it turned out. The steel makes the house look like it's been here for years already.

Saturday, February 16, 2013

Central Vacuum

One item I wanted to get for the house was a central vacuum. There is a surprising selection of brands and types of vacuums out there. From my research, there are basically two approaches one can take:
  • Standard power vacuum, many outlets (or inlets?), and a relatively short hose
  • High power vacuum, few outlets, and a long, retractable hose per outlet. 
I ended up going with pursuing the second option. It uses the locally-made Hide-a-hose system, which is really convenient. I like that it requires fewer outlets, so there's less attaching and and detaching of endings. I also think that fewer outlets mean that there is less clutter and less to break. The only disadvantage is that it is more expensive because the valves cost more, you need separate hoses, and the vacuum needs to be powerful enough to be able to suck the hose back into the wall once you're done with it. 

For a house of my size, I was quoted about $1800 for option 1 (main unit, garage kit, kitchen dustbin, and 6 outlets throughout the house), and $2500 for option 2 (main unit, garage kit, kitchen dustbin, and 3 hide-a-hose outlets with 40ft hoses). 

central vac in the kitchen with part of the hose coming out of the wall

vacuum in the garage

The main unit is a VacuFlo FC650. It's a filtered cyclonic vacuum cleaner, so there are no vacuum bags. All the dust and debris falls into a 6 gallon removable bin. When I briefly tested it out, I was pleased with how powerful and quiet the system was. With the main unit in the garage, most of the noise I heard was just the sound of air flowing into the hose. I'm looking forward to using it!

Monday, February 4, 2013

Drywall

For the drywall, I wanted a couple specific things - a level 5 finish and a 1/2" reveal for the base. Drywall installation and finishes come in several different levels of quality. Most houses have an "orange peel" texture applied to the walls. This is done to better hide imperfections in the seams between the drywall panels. In order to keep with the minimalist aesthetic, I wanted to have no texture applied to the walls. This requires more effort to be put into the installation since any imperfections would be immediately visible. 

First, all the studs had to start out perfectly lined up. Using a laser, the drywall contractors carefully stapled furring strips to the studs where necessary throughout the house. 

Furring strips stapled to the studs
They then screwed on the drywall and taped and mudded all the seams.

Taped and mudded seams
After that dried, they applied more coats of joint compound to the walls to further smooth all the transitions.

Additional layers of joint compound applied
And finally, they applied a skim coat across the entire wall and sanded it down to give the wall a perfectly smooth, textureless finish.

Bedroom with finished drywall
perfectly smooth walls

The resulting walls look great. The drywallers also spent a lot of time installing a 1/2" Z-channel base in the walls in lieu of any trim. This creates a shadow-line between the floor and the wall and looks really clean.

1/2" reveal base with level 5 finish

Special thanks to Artistic Drywall for doing such a good job and being on budget.

Wednesday, December 12, 2012

Front Door

Finding an entry door was much more of a challenge than I anticipated. The requirements in concept were simple - I wanted a door that looked as similar as possible to the neighboring windows in the foyer. I quickly found out that almost all residential front doors are made out of wood, not aluminum and glass. There is, however, a type of door that does fit the requirement - commercial storefront doors!

I started calling up various door vendors in the area including Vortex doors and Goldfinch Brothers, but had bad luck with all of them. The sales reps sometimes didn't respond, took forever to supply a quote, gave ridiculously high bids, or were disinterested in my queries. My guess is that since my search was rather unusual and one-off, the salespeople didn't see value in working with me.

After about 3 months of frustration, I finally found a vendor willing to work with me on a custom storefront door. Washington Door Service does about 80% residential and 20% commercial work. I ended up getting a Pacific Aluminum 300 series storefront door with the following features:
  • narrow stile
  • insulated glass
  • weather sealing
  • Adams Rite handle and locking mechanism
  • electrified door strike
  • hidden, continuous hinge
The door was manufactured and installed in 2 weeks time. It looks great, and I'll be able to enter and exit the house without needing a key!

Front door from the outside

Nice, modern Adams Rite handle

View from the inside

Monday, October 15, 2012

Insulation

In my research, I came across many different types of insulation that one can install in a new construction home:
  • fiberglass - by far the most common and cheapest
  • blown-in cellulose - this is where, with the use of a special machine, one fills all the cavities between the studs with a loose-fill cellulose fiber insulation. The benefit this provides over fiberglass is that it behaves more like a liquid during installation. It fills in all the gaps that might be left with fiberglass batting, has greater thermal mass, and is easy to manufacture
  • open-cell foam - this is a type of spray-on foam. It does not provide air or water-tightness, but is easier to apply as closed-cell foam. 
  • closed-cell foam - this is by far the best and most expensive type of insulation I came across. Similar to the open-cell insulation, a polymer liquid is sprayed onto the walls, and it expands as it cures. This type of foam provides very high R-values as well as creates an air and water-tight seal against whatever surface it covers

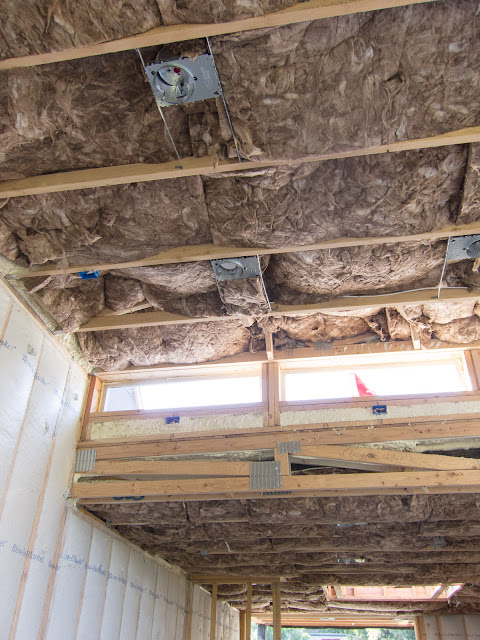
In order to get the most benefit out of the properties of the different materials and to save cost, I went with a hybrid approach. All ceilings were sprayed with a 1" layer of closed-cell foam, then the rest covered in fiberglass batting. That gives the benefits of the air-tightness of the foam and saves costs. The 2nd and 3rd floor walls were all given a blow-in cellulose treatment. 

Blow-in insulation on walls and closed-cell foam on ceilings

The rafters get filled in with fiberglass

Lastly, there was a bit of an error made in the planning of the downstairs area. Downstairs, much of the the concrete walls are exposed and insulated from the outside of the house. Unfortunately, the city inspector didn't like that there was a section of wall near the top that is not insulated from either side of the house. In order to keep the proper look of the house from the outside, I decided that the downstairs area walls should be framed out and insulated. I lost about 6" from the room, but I don't think it will be noticed. 

Monday, October 8, 2012

Siding Part 2 - Charred Cedar

The siding contractors have finished installing the first of three siding materials on the house - charred cedar. This type of siding originates from an old Japanese technique called shou sugi ban. Traditionally, planks of wood are set on fire and allowed to burn for a few minutes before being extinguished. This creates a dark layer of carbon on the surface of the wood that serves as a natural layer of protection. The benefit of this technique over staining is that it is low-maintenance and will not fade over time. 

A truly authentic application of this technique would have leave the wood planks with deep veins, which I didn't want in a modern application. The contractors instead used a blow torch to burn the surface, rinsed and scrubbed the planks, and repeated the process three times to achieve an even tone in the wood without over-burning it. 

Blow-torching cedar siding. That looks like fun! (he had a big smile while he was doing this)

Rinse, scrub, and repeat
The result
 It looks really nice on the house, and hopefully will be very low maintenance. I think that over time, the dark brownish tint of the siding coming up from beneath the carbon layer will fade to a grey and will still compliment the other materials on the house.

Front of the house in full sunlight

Back of the house

Western side of the house